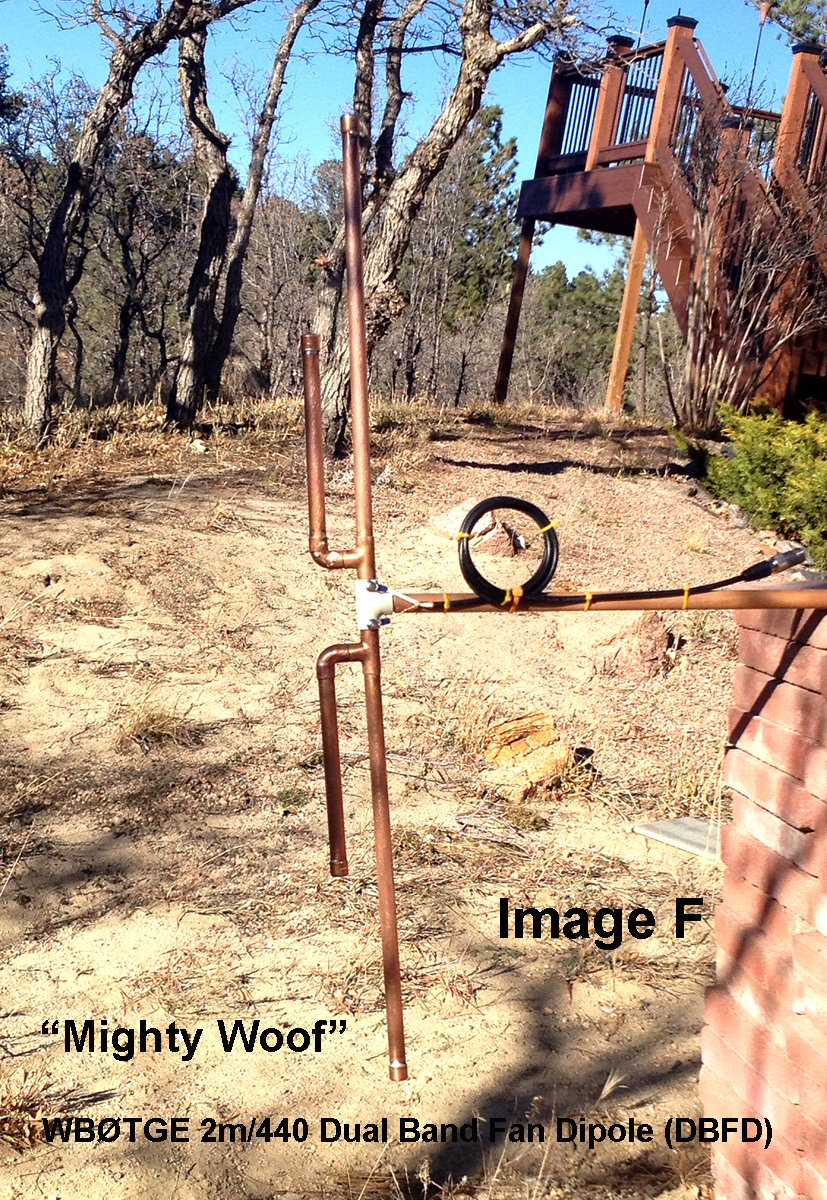
I call this the “Mighty Woof” antenna. It reminds me of two “Wouff Hong” (created by Hiram Percy Maxim) joined together at the base creating an awesome signal.
The WØTLM 2013 fall tech day had many great displays and instructional sessions for club members. I watched a presentation by Bob Witte, KØNR, which discussed the many types of antennas available to amateur radio operators and the benefits each antenna design provides. It was an excellent technical presentation.
One of the antennas Bob discussed was the HF wire fan dipole. This is a multi-band antenna which gives the amateur the capability of utilizing several radio bands with only one feeder line. The fan dipole is usually constructed of multiple sections of wire tuned for each band required.
Click on images to enlarge.
 That night at home the thought struck me that the fan dipole could be used for the VHF/UHF bands. I like building antennas from copper pipe and have made many j-poles for myself and others. I did an online search for copper pipe fan dipoles and found none. Was it because they didn’t work? Well that became a challenge. The design presented here was developed empirically by using cut and test methodology with SWR measurements being made after each adjustment..
The antenna is constructed using 1/2” copper pipe and copper fittings. Cost <$25. The center section utilizes a 1/2” NIBCO CPVC SxSxS Tee purchased at Home Depot. This plastic tee inside diameter matches the outside diameter of 1/2” copper pipe.
Construct two half sections of the dipole using the dimensions in the following image (Image A).
 As you cut the copper pieces fit them together and measure the result. Measure with the end caps on the ends of the two long sections. The end caps are included in the finished dimensions. Cut each piece of copper pipe a little long initially so that you can trim to fit the finished dimension later. This is necessary because copper fittings vary in dimension between manufacturers. Use a 7/8” length piece of copper pipe to butt join the elbow to the tee at the base of the dipole half. Also the piece on the bottom of the dipole half should not extend more than 1/2” from the tee.
When you purchase the 90 degree elbows find the most compact sizes. This will allow the elbows to be butt soldered to the tees for the proper center dimension of the fan dipole without having to trim one or both of the elbows to make them shorter.
After all of the pieces have been cut/trimmed, fitted together and measured, solder the pieces using lead free solder and flux.
(NOTE: I know there are discussions that plumbing flux should never be used on electronics, however, this is not electronics it’s plumbing, so don’t worry. This soldering method is what is needed for the outside use of these antennas. Wear protective clothing, work in a well ventilated area, and observe proper safety precautions whenever soldering.)
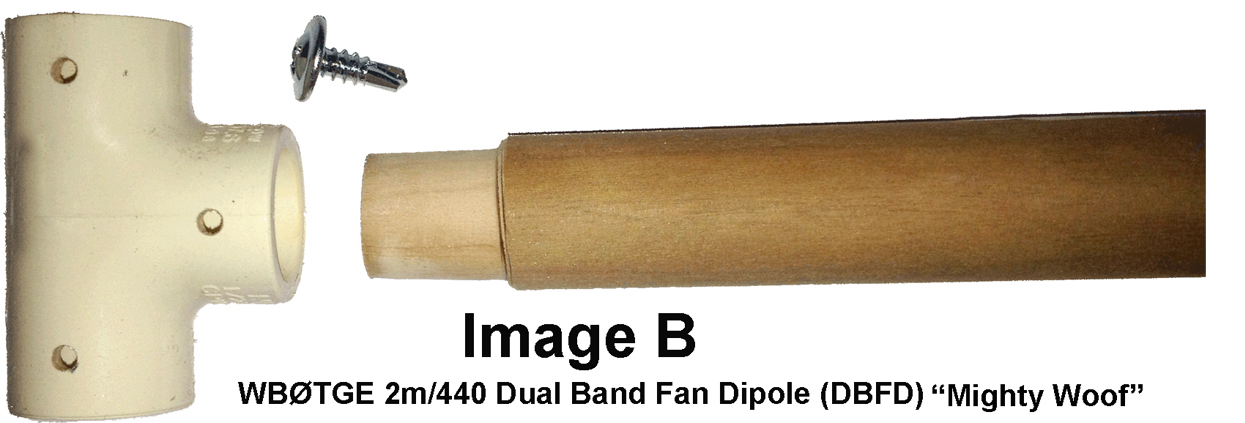 Looking at Image B, drill three 1/8” pilot holes on one side of the plastic tee about 1/4” from the ends of the openings. The image shows the 1/2” self-tapping screw used and the hardwood dowel used as the the mounting mast for the antenna. Sand the dowel end to match the inside diameter of the tee. Make it a press fit and long enough to seat completely into the tee opening. The copper pipes and wood dowel are secured to the tee using the self-tapping screws.
After soldering the two half sections together it’s time to assemble the antenna. The dipole half’s need to be driven into the plastic tee. If you look at Image A, inside the tee on each hole is a ledge about 1/2” down inside. This ledge is where the dipole half’s rest when the antenna is assembled.
Take the two dipole half’s and insert them into opposite sides of the tee. Orient the tee so that the center hole is facing opposite the two shorter elements per Image A
Place one end of the antenna on a piece of wood, using another piece of wood for protection, tap the other dipole end and force the dipole half’s into the tee until both are seated completely up to the copper tee of each half or resting on the ledge. Secure the plastic tee to each dipole half using ½” self-tapping screws through the previously drilled holes and into the piece of copper pipe pressed into the plastic tee as shown in Image C. The screws will drill into the copper pipe without pre-drilling the pipe. Don’t over-torque the screws. Attach the dowel also with a self-tapping screw. It is important that the screws “screw” into the copper pipe for connection of the coax.
(NOTE: If self-tapping screws are not available, pre-drill a small hole for the size screw available. Use the holes drilled in the plastic tee for a guide since the copper pipe is already seated in the tee.)
 Now you are ready to attach the coax to the antenna (Image C). Separate the shield from the center conductor insulation for a distance of about 2-3 inches. Attach circular wire end rings to the coax and center conductor. Take out the screws attaching the dipole half to the tee and attach the coax to the antenna using the dipole half screws. It doesn’t matter which wire goes to which side.
(NOTE: Had the coax ring connectors been installed while the copper pipe was being drilled with the self-tapping screw, excess torquing of the cables may have occurred as the screws seated themselves against the plastic tee. The screws can now be re-tightened with a screw driver.)
A SO-239 Jack Panel Mount with two sturdy copper wires attached to it as leads can be used instead of the direct wiring of the coax to the dipole. Solder or screw the leads of the SO-239 to the dipole half’s.
Wind a loop using about four or five turns of coax (about 5 inch diameter) to provide an RF choke. A good idea would be to silicone the screws to prevent oxidation, seal around the copper and plastic tee seams, and finally seal the coax attachment area with rubber electrical tape which will conform to the shape of the tee.
The coax should trail away perpendicular to the antenna for a distance greater than ½ wavelength before making a turn, else the feedpoint impedance may be affected and drive up SWR somewhat. Wire tie the coax to the mast.
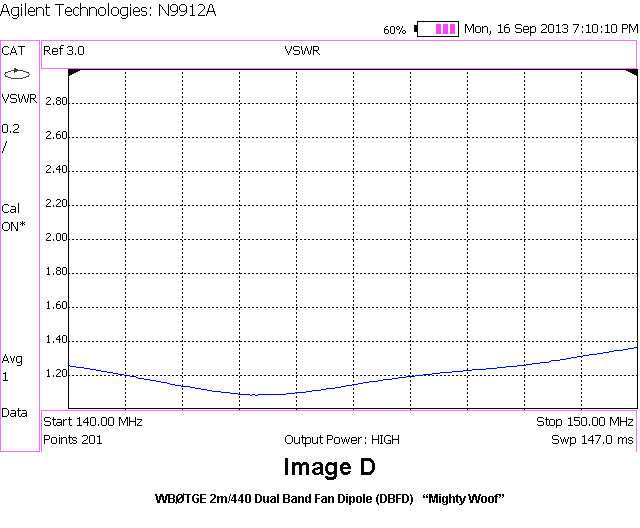
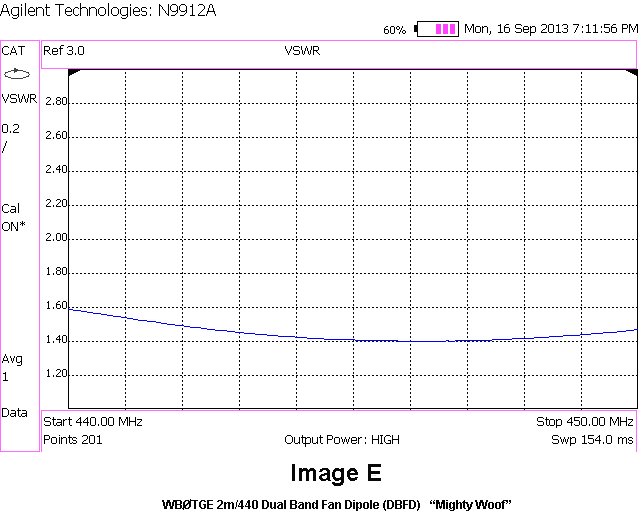
This antenna has a very broad bandwidth and the SWR is consistent and low throughout it’s intended frequency ranges as can be seen by the SWR plots (Images D and E). Thanks to Bob, KØNR for providing the plots and Stu Turner, WØSTU for editorial help. The antenna is compact.
Have fun with this antenna.
Al – WBØTGE
Downloadable PDF file of this project
WBØTGE – Mighty Woof – 2m_440 DBFD Antenna